All posts by mesala

proftpd asennus

  • Avaa terminaali
  • Kirjaudu pääkäyttäjänä root (sudo -i)
  • Päivitä paketit apt-get update
  • Asenna proftpd (apt-get install proftpd)
  • Konfiguroi proftpd.conf (/etc/proftpd/proftpd.conf), jossa muuta palvelimen nimi ja osoita jokainen käyttäjä kotihakemistoonsa.
    ServerName “Debian” -> oman palvelimen nimi
    #DefaultRoot ~ -> DefaultRoot ~/
  • Käynnistä proftp palvelu uudestaan ( service proftpd restart ) (/etc/init.d/proftpd restart)
  • Tee ftp käyttäjille oma kansio, esim /ftp (mkdir komento)
  • Tee testikäyttäjä useradd komennolla
  • (useradd asentaja -d /ftp/asentaja -m -s /bin/false)
  • Testaa palvelimen toiminta ftp ohjelmalla

USERMOD

Options:
-c, –comment COMMENT new value of the GECOS field
-d, –home HOME_DIR new home directory for the user account
-e, –expiredate EXPIRE_DATE set account expiration date to EXPIRE_DATE
-f, –inactive INACTIVE set password inactive after expiration
to INACTIVE
-g, –gid GROUP force use GROUP as new primary group
-G, –groups GROUPS new list of supplementary GROUPS
-a, –append append the user to the supplemental GROUPS
mentioned by the -G option without removing
him/her from other groups
-h, –help display this help message and exit
-l, –login NEW_LOGIN new value of the login name
-L, –lock lock the user account
-m, –move-home move contents of the home directory to the
new location (use only with -d)
-o, –non-unique allow using duplicate (non-unique) UID
-p, –password PASSWORD use encrypted password for the new password
-R, –root CHROOT_DIR directory to chroot into
-s, –shell SHELL new login shell for the user account
-u, –uid UID new UID for the user account
-U, –unlock unlock the user account
-v, –add-subuids FIRST-LAST add range of subordinate uids
-V, –del-subuids FIRST-LAST remove range of subordinate uids
-w, –add-subgids FIRST-LAST add range of subordinate gids
-W, –del-subgids FIRST-LAST remove range of subordinate gids
-Z, –selinux-user SEUSER new SELinux user mapping for the user account

usermod -l newname oldname

userdel

Options:
-f, –force force removal of files,
even if not owned by user
-h, –help display this help message and exit
-r, –remove remove home directory and mail spool
-R, –root CHROOT_DIR directory to chroot into
-Z, –selinux-user remove any SELinux user mapping for the user

Jos halutaan vaikka poistaa käyttäjä wp ->

userdel wp

USERADD

-b, –base-dir BASE_DIR base directory for the home directory of the
new account
-c, –comment COMMENT GECOS field of the new account
-d, –home-dir HOME_DIR home directory of the new account
-D, –defaults print or change default useradd configuration
-e, –expiredate EXPIRE_DATE expiration date of the new account
-f, –inactive INACTIVE password inactivity period of the new account
-g, –gid GROUP name or ID of the primary group of the new
account
-G, –groups GROUPS list of supplementary groups of the new
account
-h, –help display this help message and exit
-k, –skel SKEL_DIR use this alternative skeleton directory
-K, –key KEY=VALUE override /etc/login.defs defaults
-l, –no-log-init do not add the user to the lastlog and
faillog databases
-m, –create-home create the user’s home directory
-M, –no-create-home do not create the user’s home directory
-N, –no-user-group do not create a group with the same name as
the user
-o, –non-unique allow to create users with duplicate
(non-unique) UID
-p, –password PASSWORD encrypted password of the new account
-r, –system create a system account
-R, –root CHROOT_DIR directory to chroot into
-s, –shell SHELL login shell of the new account
-u, –uid UID user ID of the new account
-U, –user-group create a group with the same name as the user
-Z, –selinux-user SEUSER use a specific SEUSER for the SELinux user mapping

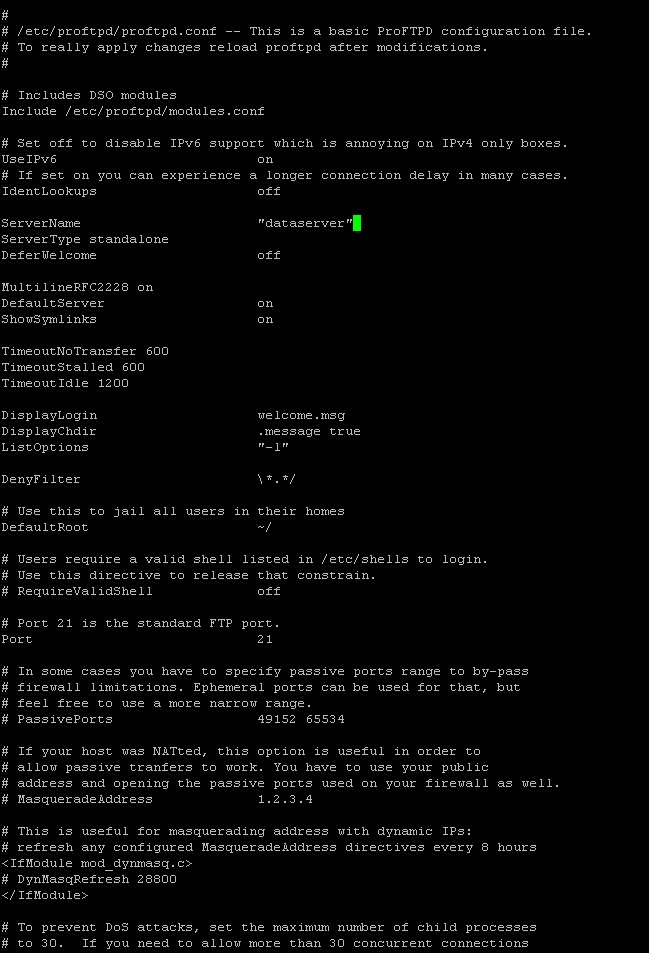
Kun halutaan tehdä ftp käyttäjä ja sen kotikansio www/hemmo -> se voidaan tehdä seuraavasti

useradd hemmo -d /www/hemmo -m -s /bin/false

Jos tehdään toinen käyttäjä datamekaanikko ftp kansioon ja siellä alikansioon data -> se voidaan tehdä seuraavasti

useradd datamekaanikko -d /ftp/data -m -s /bin/false

Apache2 asennus

Apache2 asennus linux käyttöjärjestelmään

  1. Käynnistä käyttöjärjestelmä (Kubuntu/Ubuntu/Debian)
  2. Avaa terminaali
  3. Kirjaudu pääkäyttäjänä (sudo -i)
  4. Päivitä paketit apt-get update
  5. Tee juuri tasolla kansio www, käyttäen komentoa mkdir www
  6. Asenna Apache2 (apt-get install apache2)
  7. Konfiguroi Apache2.conf ja muuta halutuksi www-kansion osoitus (etc/apache2/sites-available/)

Huomioi että eri apache2 käännösversioissa on erilaiset konfiguraatiotiedostot! Lisää käännösversiosta voit lukea apachen sivuilta.
Halutessa kansioita voi asettaa salasanan taakse ja siihen tarvitaan konfigiin muutos ( AllowOverride AuthConfig ) Apachen tietoturvaa voi parantaa lisäämällä kaksi riviä apache2.conf tiedostoon.
ServerSignature off
ServerTokens Prod

Käynnistä Apache2 uudelleen ( /etc/initd/apache2 restart ) 😛 Testaa selaimella palvelimen toiminta Lataa palvelimelle verkkosivut ja testaa niiden toiminta Access/Error logit löytyy vakiona hakemistosta:
/var/log/apache2/ Logien analysointiin mielestäni hyvä työkalu on goaccess.
Se on avointa lähdekoodia sekä se toimii suoraan komentorivillä. /apache2/mods-enables/dir.conf tiedostoon lisätään tiedostonimiä lisää, avautumisprioriteetti on samassa järjestyksessä kuin tiedostoa luetaan.
esim:
DirectoryIndex index.html index.cgi index.pl index.php index.xhtml index.htm Index.htm main.html main.htm Main.htm koti.html Koti.html koti.htm koti.php Koti.php home.html Home.html home.htm